
SharePoint Site Script & Site Design

 Hope you are doing fine and safe in this pandemic situation. I recently came up with an opportunity to work with SharePoint Site Designs.

SharePoint Site templates are now replaced with Site designs in Modern Sites. SharePoint allows us to create JSON schema to apply our custom options that we want to add.

Below are the things we can apply using site script.

  • Create a new SharePoint list
  • Define a new site column
  • Define a new content type
  • Add a navigation link
  • Remove a navigation link
  • Apply a theme
  • Set branding properties
  • Set a site logo
  • Join a hub site
  • Install an add-in or solution
  • Register an extension
  • Activate a Feature
  • Trigger a flow
  • Configure regional settings
  • Add users (principals) to SharePoint Groups
  • Manage guest access

Let us assume we have a JSON schema created. I am taking below sample from MS documentation for reference.


We will now be adding above JSON schema to SharePoint as Site Script. Below is the command we execute.

$site_script = ‘{

  "$schema": "https://developer.microsoft.com/json-schemas/sp/site-design-script-actions.schema.json",

  "actions": [

    {

      "verb": "applyTheme",

      "themeName": "Contoso Explorers"

    },

    {

      "verb": "createSPList",

      "listName": "Customer Tracking",

      "templateType": 100,

      "subactions": [

        {

          "verb": "setDescription",

          "description": "List of Customers and Orders"

        },

        {

          "verb": "addSPField",

          "fieldType": "Text",

          "displayName": "Customer Name",

          "isRequired": false,

          "addToDefaultView": true

        },

        {

          "verb": "addSPField",

          "fieldType": "Number",

          "displayName": "Requisition Total",

          "addToDefaultView": true,

          "isRequired": true

        },

        {

          "verb": "addSPField",

           "fieldType": "User",

          "displayName": "Contact",

          "addToDefaultView": true,

          "isRequired": true

        },

        {

          "verb": "addSPField",

          "fieldType": "Note",

          "displayName": "Meeting Notes",

          "isRequired": false

       }

      ]

    }

  ],

  "version": 1

}’

Add-SPOSiteScript -Title "<Title>" -Content $site_script -Description "<Description>"


We executed you should select output like below.


Now we use above GUID and create a site design.

Add-SPOSiteDesign -Title "<Title>" -WebTemplate "64" -SiteScripts "<Site Script GUID>" -Description "<Description>"

Note: Identifies which base template to add the design to. Use the value 64 for the Team site template, and the value 68 for the Communication site template.


How to Apply Site design to existing site

  •      We can create a Team Site from Admin center and select our site design while creating one.
  •      We can apply custom design to existing site using below steps
            Note: 

You can can apply site design using Power Automate, Please refer my 
blog.
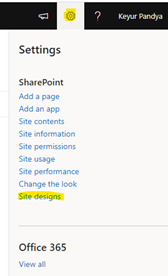
    •        Click on Gear icon on top right corner
 
    •        Select Site Design from Menu


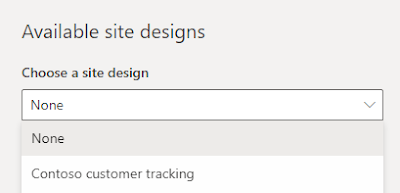
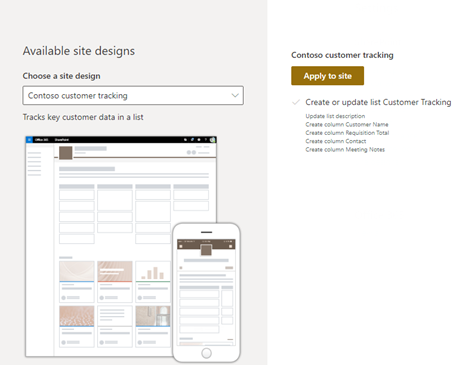
    •        Select your design template
   

    •        Click on “Apply to Site” to apply design to site. You can click on “View Updated Site” once all tasks are completed.


     You can can apply site design using Power Automate, Please refer my blog.

Comments

Popular posts from this blog

Business Data Connectivity

I came to a requirement wherein I was supposed to get data from an 3 rd party portal using API’s and then bring them to SharePoint server. The first approach that I finalized was just to make BDC solution that will get data from 3 rd party portal and will deploy it to SharePoint. How to Create BDC solution in SharePoint? I found below link that is having really great description about hot to create and deploy the BDC solution to SharePoint. http://www.c-sharpcorner.com/uploadfile/hung123/creating-business-data-connectivity-service-using-visual-studio-2010/ After creating an POC I came to know that BDC model cannot be deployed on Multi tenant farm. So what can be done next? After some amount of googling I came to know that we can create BDC solution using WCF services also. So I created a WCF service solution that acted as a wrapper that used to fetch data from the portal. We can them publish that service to IIS or Server and use the servic...

SharePoint Server continuously prompting for Credentials

Sometimes it is the case when your SharePoint server keeps on prompting for credentials. After some amount of googling and going through some reliable blogs I found following solution. Open Run Type “regedit”.                                                                  In the registry window left panel find HKEY_LOCAL_MACHINE > SYSTEM > CurrentControlSet > Control > LSA                                                                                                                      Now right clic...

Identity client runtime library (IDCRL) did not get a response from the login server.

Recently I was doing some testing with a background PowerShell and encountered a weird error. “Identity client runtime library (IDCRL) did not get a response from the login server”. The error that you might encounter while working with PowerShell. This error is very misleading when it comes to identifying what could go wrong. After doing quite a good amount of research below are the probable causes for the error. Invalid Credentials MFA (Multi-Factor Authentication) Manage security defaults. Solutions Invalid Credentials Check if your credentials are wrong. Especially if you are using variables. MFA (Multi-Factor Authentication) Check if MFA is enabled on the account which you are using. These only affect you badly if you are developing PowerShell for a background Job. Go to Microsoft 365 admin center Users -> Active users -> Select the user -> Manage multifactor authentication -> Select the user -> Disable multi-factor authentication. M...