
Power Automate Customer Connectors

Recently I came across a requirement to create an interface between SharePoint and 3rd party project management tool.

Click here login with your Ofice365 account. Click on Data > Custom Connector menu option from left navigation pane.


Click on "New Custom Connector" from top right corner.


Select Create from blank. You can now see a new connector creation screen.

General Tab

Provide the host URL and API end point URL. Click on "Security" tab select the authentication method that the source tool is using.


Security Tab

Based on your selection rest of the input controls will be be shows, Lets assume you have selected 0Auth 2.0.

You should now see columns like 

  • Client ID : is id from app registered in project management tool to consume API. 
  • Client Secret : is a secret key generated by the source from where you are to consume API.
  • Authorization URL : is token generation endpoint URL. 
  • Token URL : is Refresh token URL.
  • Scope : Specify if the API documentation has any details for it.
  • Redirect URI : This is auto generated by power automate, you need to copy this and configure it in your app that you register to consume API's in source system.


Now, lets go the the definition tab. 

You can create 3 things here.

  1. Actions: Allows you to create an action from one API endpoint. Actions are basic components that we use while creating a Flow ex. GetItems, GetFileName and so on...
  2. Triggers: Triggers are events that would result into starting the flow execution.
  3. Policies: Policies can be used to perform actions like replacing the endpoint url before the call is made. We can also create a policy that ensures a set of headers is always passed with each call and so on. 

Definition Tab

To create an action, click on "New Action" button

Fill the Summary, Description and Operation ID. Operation ID is the one that will be visible as action title. Description is that we see while adding the action in power automate flow.


Visibility
  1. None: Shows properly to take input, when action is added.
  2. Advanced: These input boxes are mostly of not required type and will be visible only when "Show Advanced Mode" is clicked.
  3. Internal: Internal visibility is used when you have static values of calculated values to be passed.
  4. Important: Important ensures that field is shown on top.
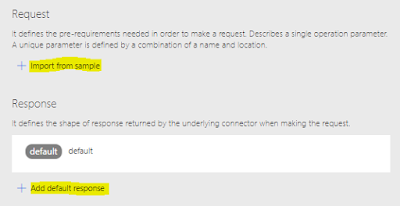


Request

Click on "Import from sample"


Select verb, add the end point URL, headers and default body if necessary.

Click on "Import" button. this will handle the request body part.


Note: You can add Query String and body parameters to the request URL, this can be modified later. You can also attach dependent actions to get dropdown options for lookup values. 

Response

You can add default response by clicking on "Add default response". You can rename the response title as well.

You are done with custom connector.

Note: you can update each Request/Response properties display name and description. 

Test Tab

You can now click on test tab, select your action and perform a test.

Comments

Popular posts from this blog

Business Data Connectivity

I came to a requirement wherein I was supposed to get data from an 3 rd party portal using API’s and then bring them to SharePoint server. The first approach that I finalized was just to make BDC solution that will get data from 3 rd party portal and will deploy it to SharePoint. How to Create BDC solution in SharePoint? I found below link that is having really great description about hot to create and deploy the BDC solution to SharePoint. http://www.c-sharpcorner.com/uploadfile/hung123/creating-business-data-connectivity-service-using-visual-studio-2010/ After creating an POC I came to know that BDC model cannot be deployed on Multi tenant farm. So what can be done next? After some amount of googling I came to know that we can create BDC solution using WCF services also. So I created a WCF service solution that acted as a wrapper that used to fetch data from the portal. We can them publish that service to IIS or Server and use the servic...

Identity client runtime library (IDCRL) did not get a response from the login server.

Recently I was doing some testing with a background PowerShell and encountered a weird error. “Identity client runtime library (IDCRL) did not get a response from the login server”. The error that you might encounter while working with PowerShell. This error is very misleading when it comes to identifying what could go wrong. After doing quite a good amount of research below are the probable causes for the error. Invalid Credentials MFA (Multi-Factor Authentication) Manage security defaults. Solutions Invalid Credentials Check if your credentials are wrong. Especially if you are using variables. MFA (Multi-Factor Authentication) Check if MFA is enabled on the account which you are using. These only affect you badly if you are developing PowerShell for a background Job. Go to Microsoft 365 admin center Users -> Active users -> Select the user -> Manage multifactor authentication -> Select the user -> Disable multi-factor authentication. M...

Copying Footers Between SharePoint Sites Using PnP PowerShell

Recently, I have been extensively working with SharePoint and the Patterns and Practices (PnP) PowerShell module. PnP has significantly simplified various tasks by providing easy-to-use command sets and thorough documentation. One particular task that PnP has made straightforward is copying a footer from one SharePoint site to another. This process can be achieved with just a few commands. Why Use PnP PowerShell? PnP PowerShell is a set of cmdlets designed to work with SharePoint Online and SharePoint on-premises. It simplifies the management and automation of common tasks and provides commands for nearly every aspect of SharePoint administration. The PnP module is especially useful for tasks that would otherwise require complex scripting or manual intervention. Copying a Footer with PnP PowerShell To copy a footer from one SharePoint site to another, follow these steps. This process involves exporting the footer template from the source site in XML format and...